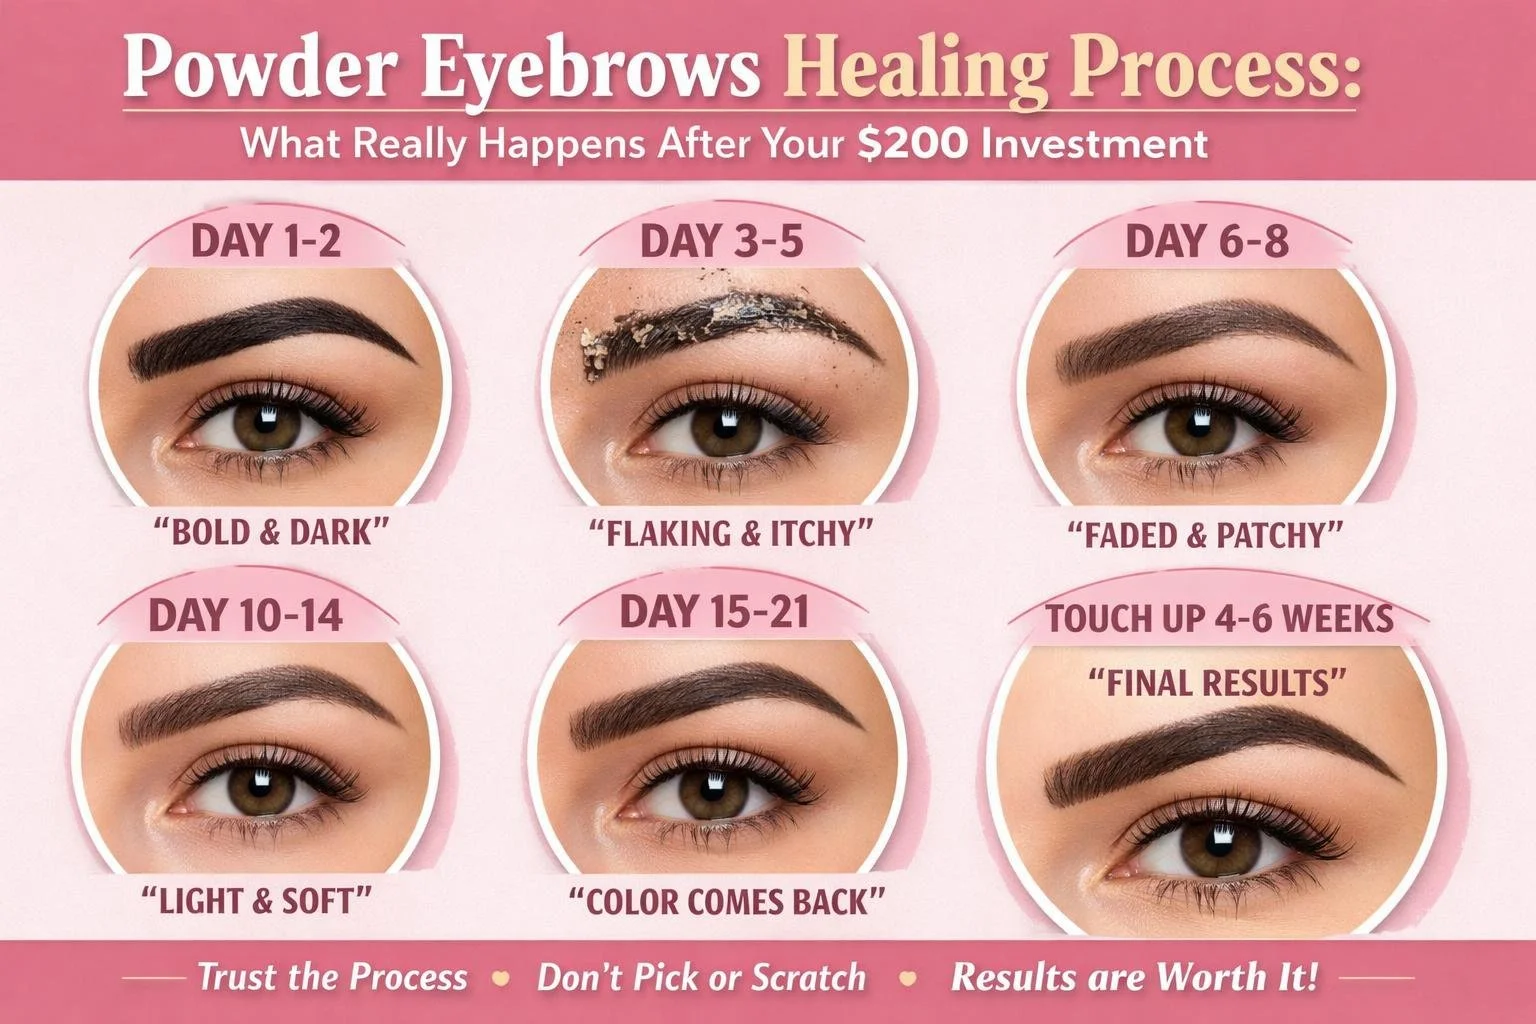
Powder Eyebrows Healing Process: What Really Happens After Your $200 Investment
I got a frantic text at 9:47pm on a Thursday from a client who'd had powder brows done five days earlier.
"Something is WRONG. My brows are peeling off. Like, actually coming off in chunks. I can see the color on my pillowcase. Half of one brow looks like it's disappeared. Did the procedure fail? Should I come in? I'm freaking out."
I texted back immediately: "Everything you're describing is completely normal. You're in the flaking phase. This is exactly what's supposed to happen. The color isn't gone — it's just hidden under the flaking layer. Trust me. Don't pick at it. It will be fine."
She didn't believe me. She sent photos. Her brows looked patchy, uneven, concerning. I understood her panic — if you don't know what normal powder brows healing looks like, day 5-7 is absolutely terrifying.
I reassured her again: "I know this looks bad. Every client panics at this exact phase. In three more days, the flaking will be done and you'll see the color that actually took. Come back in four weeks for your touch-up as planned. Everything is fine."
Four weeks later, she came in for her touch-up, embarrassed. "You were right. By day 10, they looked completely normal. I'm sorry I panicked."
I told her what I tell everyone: "Don't apologize. If I had a dollar for every client who texts me during the flaking phase thinking something's wrong, I could retire. This is why I'm writing everything down — so you know what's normal and when to actually worry."
This is that resource. The complete, honest, detailed guide to powder brows healing that tells you exactly what happens each day, what's normal versus concerning, and how to get through the process without panicking at 10pm thinking your $200 investment is falling apart.
Because here's the truth: healing powder brows looks terrible before it looks amazing. And if you don't know that going in, you'll convince yourself something went wrong during the exact phase where everything is going exactly right.
What Actually Happens During Powder Brows Healing
Before I walk through the day-by-day timeline, you need to understand what's happening biologically so the process makes sense.
The Science of Semi-Permanent Pigment Healing
When I create powder brows, I'm using a digital machine with a single needle to deposit thousands of tiny dots of pigment into your skin's upper dermis layer. This creates controlled micro-injuries throughout your brow area.
Your body immediately recognizes these micro-wounds and initiates its healing response:
Inflammation phase (Days 0-3): Blood flow increases to the area, bringing white blood cells and healing factors. Lymph fluid seeps from the tiny wounds, mixing with the pigment on the surface. This is why brows look so dark initially — you're seeing pigment that's going INTO your skin plus pigment sitting ON TOP of your skin mixed with lymph and minimal blood.
Proliferation phase (Days 4-14): Your body creates new skin cells to replace the damaged outer layers. The epidermis (outer skin) regenerates and pushes up toward the surface. As these new cells reach the surface, the damaged outer layer containing surface pigment sheds away in flakes. This is the dramatic, concerning phase where color appears to be "coming off."
Remodeling phase (Days 15-60): The new epidermis fully forms over the pigment that settled into your dermis. Inflammation resolves completely. The true color that your skin retained becomes visible. Over the next 6-8 weeks, this color continues settling and oxidizing as your skin completes the healing process.
Why It Looks Worse Before It Looks Better
The healing process creates a predictable pattern that looks concerning if you don't expect it:
Week 1: Brows are much darker than the final result because you're seeing surface pigment plus implanted pigment
Week 2: Surface pigment flakes off, making brows look lighter, patchy, and uneven — even though the permanent pigment is still there underneath
Weeks 3-6: True retained color emerges, but it's 40-50% lighter than the initial application
Touch-up at 6-8 weeks: We build on the healed foundation to create your final result
Understanding that this dramatic change is intentional and expected helps you get through it without panic.
What Your Body Is Doing With the Pigment
Not all the pigment I deposit stays in your skin permanently. Here's what happens:
About 40-50% is on the surface or shallow: This pigment never settles into the dermis properly. It sits in the epidermis or on the surface, and your body sheds it during the natural exfoliation process in weeks 2-3.
About 50-60% settles into the dermis: This is the pigment that becomes your semi-permanent color. It's deep enough that your body's normal skin shedding doesn't remove it, but shallow enough that your immune system gradually breaks it down over 2-3 years.
Your immune system continuously works on it: Even after healing, your body continues slowly breaking down the foreign pigment particles. This is why powder brows fade gradually over time and need maintenance.
This is why the initial application looks so dark and bold — I'm applying enough pigment that even after 50% is lost during healing, you still have sufficient remaining pigment for good coverage.
Day-by-Day Healing Timeline: What to Expect
Now let me walk through exactly what happens each day so you know what's normal.
Day 0: Immediately After Your Appointment
What your brows look like:
Very dark, bold, almost startling
Much darker than the color we discussed
Possibly too dark for your comfort level
Slightly red around the edges from the procedure
Defined shape showing exactly where we worked
What you're feeling:
Tender and sensitive in the brow area
Slight burning or heat sensation
Tightness across the brows
Some mild swelling possible (rare but can happen)
What you should do:
Go directly home, don't go to work or social events
Keep brows clean — gently blot with damp (not wet) cotton pad if needed
Apply thin layer of provided healing ointment
Avoid touching or rubbing
Sleep with head elevated on extra pillows to minimize swelling
What you're thinking: "These are SO DARK. Way darker than I wanted. Did she make them too dark?"
The reality: They're supposed to be this dark. They will lighten 40-50% during healing. What you're seeing now is NOT the final result. Trust the process.
Days 1-2: The Dark and Slightly Scary Phase
What your brows look like:
Still very dark, possibly darker than yesterday as oxidation occurs
More defined in shape than immediately post-procedure
Color is uniform and solid
May have slight scabbing forming on the surface
Possibly small amount of lymph fluid or pigment weeping
What you're feeling:
Tenderness decreasing but still present
Tightness and dryness developing
Itchiness beginning (this will get worse before it gets better)
Possibly mild headache from the procedure trauma
What you should do:
Cleanse gently 1-2 times daily with provided cleanser
Pat dry very carefully with clean tissue or cotton pad
Apply thin layer of healing ointment 2-3 times daily
Do NOT apply thick layers — thin is better
Absolutely no makeup on or around brows
No sweating, swimming, or water exposure beyond gentle cleansing
Sleep elevated
Common concerns: "They're still so dark. When will they lighten?"
"One brow looks slightly darker than the other."
"Should they feel this itchy already?"
The reality: Still perfectly normal. The lightening happens during week 2-3, not now. Slight asymmetry in healing is common and will be addressed at touch-up. Itchiness means healing is progressing.
Days 3-4: The Tight and Itchy Phase
What your brows look like:
Still quite dark
Developing a shiny or glossy appearance as scabs form
May look slightly raised or textured
Color remains solid and uniform
What you're feeling:
ITCHY — this is the most commonly reported symptom
Tight, like your skin is being pulled
Dry despite applying ointment
Strong urge to scratch (DO NOT)
Possibly mildly annoying rather than painful
What you should do:
Continue gentle cleansing 1-2 times daily
Continue thin ointment application 2-3 times daily
When itchy, apply cold compress (clean, damp washcloth) for relief
Do NOT scratch, pick, or rub
Do NOT apply more ointment thinking it will help the itching (it won't, and too much can cause problems)
Distract yourself when the itch is intense
Common concerns: "The itching is driving me crazy. Can I scratch?"
"They feel so tight I'm worried the skin will crack."
"Is the shiny appearance normal?"
The reality: Itching is the #1 complaint at this phase and completely normal. It means your skin is healing and regenerating. The tight feeling is from new skin forming. The shiny appearance is the surface layer preparing to shed. Everything is progressing normally.
Days 5-7: The Flaking Nightmare Phase
This is when I get the panicked texts.
What your brows look like:
Flaking beginning or in full effect
Pieces of color literally coming off
Brows look patchy, uneven, terrible
Some areas look much lighter than others
Possibly completely bare patches appearing
You can see flakes on your pillow, in the shower, on your face
What you're feeling:
Continuing itchiness, possibly intensifying
Tightness where skin is flaking
Urge to pick at the flakes (RESIST)
Probably panicking that the procedure failed
What you should do:
Continue gentle cleansing — DO NOT scrub or try to remove flakes
Let the flakes fall off naturally in their own time
Continue light ointment application
Do NOT pick, peel, or pull flakes off
Resist the urge to look in the mirror constantly
Remember: this is temporary and normal
What you're thinking: "Oh my god, all the color is coming off. Half of one brow looks completely gone. The other brow still has color. They're completely uneven. This didn't work. I wasted $200."
The reality: This is THE MOST COMMON panic point, and it's completely, entirely, 100% normal. The color coming off is only surface pigment and dead skin cells. The permanent pigment is still underneath, but you can't see it yet because the flaking layer is blocking it. When the flaking is complete (2-4 more days), you'll see the actual retained color. Nothing is wrong. This is exactly what's supposed to happen.
I PROMISE you: by day 10-14, when the flaking is complete, you'll look back at photos from day 5-7 and think "I can't believe I panicked over that."
Days 8-10: The Patchy and Confusing Phase
What your brows look like:
Flaking mostly complete or finishing up
Still look uneven and patchy
Some areas have color showing through, others look bare
Lighter than the initial application but not final color yet
Possibly different amounts of retention in different areas
What you're feeling:
Relief that the intense flaking is ending
Continued confusion about the uneven appearance
Worry that one brow healed better than the other
Impatience to see the final result
What you should do:
Continue gentle care but can slightly reduce ointment frequency
Can start using gentle regular moisturizer if skin feels dry
Still avoid makeup directly on brows
Can carefully apply makeup around brows if needed
Common concerns: "They're so patchy and uneven. Will they stay like this?"
"One brow looks like it healed and one looks like it barely took."
"They're way too light now. Did too much come off?"
The reality: You're seeing the first-pass result, which is intentionally conservative and will look uneven. The touch-up in 4-6 weeks will even everything out and build the coverage. What looks "too light" now will be the perfect foundation for the touch-up. Apparent asymmetry is common and easily corrected.
Days 11-14: The "Did This Even Work?" Phase
What your brows look like:
Flaking completely finished
New skin smooth and healed over
Color looks much lighter than expected
Possibly barely visible in some areas
Definitely not the bold, defined look you saw on day 1
What you're feeling:
Disappointed with how light they look
Worried you wasted money
Wondering if you should fill them in with makeup
Confused why they're so different from the initial result
What you should do:
Continue gentle skincare routine
Can resume normal makeup if desired (but I recommend waiting until touch-up to see true healed color)
Protect from sun exposure — wear SPF when outdoors
Avoid exfoliating products directly on brows
Be patient and wait for touch-up appointment
What you're thinking: "These are way too light. They're barely visible. I thought powder brows would be bold and defined. Did something go wrong?"
The reality: The light first-pass result is INTENTIONAL. I applied conservatively knowing 40-50% would shed during healing. What remains is the foundation layer. The touch-up in 4-6 more weeks will build on this foundation to create your final bold, defined result. This is not the finished product — this is halfway done. The process requires two sessions for optimal results, and you're between them.
Weeks 3-6: The Waiting Phase
What your brows look like:
Completely healed, smooth skin
Light but visible coverage
True first-pass color now showing
Consistent appearance day to day
Ready for touch-up assessment
What you're feeling:
Impatient to get to touch-up appointment
Possibly tempted to fill them in a bit with makeup
Curious what the final result will look like
What you should do:
Maintain healthy skincare routine
Wear daily SPF to protect from fading
Avoid harsh exfoliants on brow area
Can use makeup if desired but try to minimize so I can see healed result clearly
Schedule and attend touch-up appointment at 6-8 weeks
What you're thinking: "These look okay but definitely need more coverage. I'm ready for the touch-up."
The reality: This is exactly where you should be. The first session created the base. The touch-up will perfect it. Your anticipation for the touch-up is appropriate — that's when the magic happens.
Touch-Up Appointment (6-8 Weeks)
What happens:
I assess your healed first-pass results
Identify areas needing more coverage
Add pigment strategically to build intensity
Perfect symmetry and shape
Create your final result
Then the healing process repeats:
Another 2 weeks of initial healing
Same flaking phase (usually milder)
Final result emerges 6-8 weeks after touch-up
This time you know what to expect:
You don't panic during flaking
You understand the lightening is temporary
You trust the process because you've been through it
Months 3-24: Enjoying Your Results
What your brows look like:
Beautiful, defined, polished
Consistent appearance daily
Gradual, even fading over many months
Still looking great at 12-18 months
What you're doing:
Virtually no daily maintenance
Wearing SPF to slow fading
Enjoying not filling in brows with makeup
Getting compliments
What's Normal vs. What's a Problem
Let me clarify which symptoms are expected and which require contacting me.
Completely Normal and Expected
During Week 1:
Very dark, bold appearance
Slight redness or tenderness
Mild swelling (rare but possible)
Itchiness developing
Feeling of tightness
During Week 2:
Dramatic flaking with color coming off
Patchy, uneven appearance
Bare spots appearing
Different amounts of flaking on each brow
Visible flakes on pillow/in shower
During Weeks 3-6:
Light, barely-there appearance
Seeming "too light" or "didn't take"
Asymmetry between brows
Wishing they were darker/fuller
All of this is part of the planned process. None of it requires intervention.
Potentially Concerning (Contact Me)
Infection signs:
Increasing redness after day 3-4
Warmth or heat in the area
Pus or yellow/green discharge
Swelling that increases rather than decreases
Fever or feeling unwell
Foul smell from the area
Allergic reaction signs:
Severe itching that doesn't improve
Rash spreading beyond brow area
Hives developing
Difficulty breathing (seek emergency care immediately)
Healing complications:
Excessive scabbing or thick crusts
Bleeding that continues beyond day 1
Skin that cracks or opens
Extreme pain (beyond mild tenderness)
Color issues (after complete healing only):
Pigment that healed very blue, gray, or red instead of brown
Significant color in surrounding skin beyond brow area
Color that migrated outside intended shape
If you experience any of these, text or call me. Most can be addressed easily, but I need to know about them.
Things That Seem Concerning But Aren't
"One brow is healing faster/lighter/different than the other"
Completely normal
Sides of face heal differently
Corrected at touch-up
"I can barely see any color after flaking"
Expected
First pass retains lighter
Touch-up builds coverage
"They look patchy and uneven after flaking"
Normal healing pattern
Touch-up evens everything out
"They're way too light, like they barely took"
Intentional conservative first pass
Prevents going too dark too fast
Touch-up adds needed intensity
"Some strokes/areas disappeared completely"
Common in powder brows healing
Not all areas retain equally first pass
Touch-up fills in gaps
How to Actually Care for Your Healing Powder Brows
Let me give you the specific, practical instructions for optimal healing.
The First 24 Hours
Cleansing:
4-6 hours after appointment: Gently cleanse with provided cleanser
Use clean fingertips, not a washcloth
Pat dry with clean tissue
Apply thin layer of healing ointment
Throughout the day:
Blot gently if any lymph fluid appears
Apply thin ointment every few hours
Avoid touching otherwise
Keep hair off brows
Sleep elevated
Days 2-14 (Active Healing)
Morning routine:
Gently cleanse with provided cleanser
Pat dry thoroughly
Apply thin layer healing ointment
Evening routine:
Gently cleanse with provided cleanser
Pat dry thoroughly
Apply thin layer healing ointment
During flaking (days 5-10):
Do NOT try to remove flakes
Let them fall off naturally
Do NOT pick, pull, or peel
Cleanse extremely gently around flakes
Continue light ointment
Throughout this period:
No makeup on brows
No swimming, saunas, hot tubs
No intense exercise causing heavy sweating
No direct sun exposure
No sleeping on your face
No exfoliating products near brows
Weeks 3-6 (Healed, Pre-Touch-Up)
Daily skincare:
Resume normal gentle face routine
Can use makeup on and around brows
Wear SPF 30+ daily
Avoid harsh exfoliants directly on brows
Keep skin moisturized
Avoid:
Aggressive chemical peels on brow area
Microdermabrasion over brows
Laser treatments on face without protecting brows
Excessive sun exposure
Products to Avoid During Healing
Never use on healing powder brows:
Alcohol-based products
Hydrogen peroxide
Neosporin or petroleum jelly (too occlusive)
Makeup with oils or acids
Retinoids or retinol
Vitamin C serums
AHA/BHA exfoliants
Benzoyl peroxide
Essential oils
Use only:
Provided cleanser
Provided healing ointment
Gentle, fragrance-free products after initial healing
The Critical DON'Ts
DO NOT:
Pick at flakes or scabs
Scratch itchy brows
Sleep on your face
Let water stream directly on brows in shower
Apply thick layers of ointment
Use makeup during first 2 weeks
Go swimming or sit in hot tubs
Exercise intensely causing sweating
Touch brows unnecessarily
Let hair products touch brows
Following these rules dramatically improves your healing outcome and final results.
Why Some People Heal Better Than Others
Not everyone's powder brows heal identically. Here's why variation occurs:
Factors That Affect Healing
Skin type:
Oily skin: lighter first-pass retention, needs touch-up
Normal skin: good retention, predictable healing
Dry skin: excellent retention, less flaking
Mature skin: may heal lighter, require more passes
Age:
Younger skin (20s-30s): faster cell turnover, lighter retention
Middle-aged skin (40s-50s): optimal healing balance
Mature skin (60s+): slower healing, but good retention
Overall health:
Healthy immune system: normal healing
Autoimmune conditions: may affect pigment retention
Diabetes: slower healing, more careful aftercare needed
Smoking: significantly impairs healing and retention
Lifestyle during healing:
Perfect aftercare: optimal results
Sun exposure: accelerated fading
Sweating/swimming: pigment loss
Picking at flakes: patchy results, possible scarring
Medications:
Blood thinners: more bleeding during procedure, affects retention
Retinoids: accelerated cell turnover, lighter retention
Steroids: can impair healing
Your individual biology:
Some people just retain pigment better
Immune response varies individually
Cellular turnover rates differ
Collagen production varies
What You Can Control
You can't change your age, skin type, or basic biology. But you CAN control:
Aftercare compliance:
Following instructions exactly improves results significantly
Most poor healing is from picking, sun exposure, or swimming
Lifestyle modifications:
Taking 2 weeks off intense exercise helps
Avoiding sun helps
Not drinking alcohol first few days helps
Product selection:
Using only approved products prevents irritation
Avoiding harsh ingredients protects pigment
Touch-up attendance:
Coming back for touch-up as scheduled creates final result
Skipping touch-up means settling for 50-60% of potential outcome
The clients with the best results are those who follow aftercare instructions precisely and attend their touch-up appointment. It's not complicated, but it does require commitment.
Common Mistakes That Ruin Healing
Learn from others' errors:
Mistake #1: Picking at Flakes
What happens: You remove pigment that was supposed to stay, create scarring risk, cause uneven patchy results
Why people do it: The flakes are visually bothering them, they think they're "helping" the process, they can't resist
The fix: Keep hands busy with something else, wear gloves at night if you pick in your sleep, remind yourself that every flake you pick costs money in touch-up correction
Mistake #2: Getting Them Wet
What happens: Water exposure before healing is complete causes pigment loss, increases infection risk, disrupts healing process
Why people do it: They forget and take a normal shower, they go swimming thinking it's been long enough, they don't realize "keep dry" means really dry
The fix: Shower with face away from stream, wear headband or shower cap protecting brows, absolutely no swimming for 14 days, be paranoid about water
Mistake #3: Applying Makeup Too Soon
What happens: Makeup introduces bacteria to healing skin, chemicals in makeup can affect pigment, trying to remove makeup disrupts healing
Why people do it: They hate how dark/light/patchy brows look at various healing stages and want to "fix" them
The fix: Remember that healing appearance is temporary, take 2 weeks off from events requiring full makeup, accept that you'll look "not your best" briefly
Mistake #4: Exercising and Sweating
What happens: Sweat is salty and acidic, which can pull pigment out of healing skin, also introduces bacteria and increases infection risk
Why people do it: They don't want to disrupt their fitness routine, they think "just one workout" won't matter, they underestimate the impact
The fix: Take a full week off intense exercise, do gentle walking only, remember that 7 days off gym is worth 24 months of good results
Mistake #5: Sun Exposure
What happens: UV radiation breaks down pigment, causes premature fading, can alter color, increases healing time
Why people do it: Living in South Florida makes sun exposure almost unavoidable, they forget to wear hat/sunscreen, they think "it's already healed" after a week
The fix: Wear hat and SPF 50+ religiously for first month, avoid direct sun when possible, remember that Florida sun is intense year-round
Mistake #6: Using Wrong Products
What happens: Harsh chemicals strip pigment, oils can prevent healing, wrong products cause irritation or allergic reactions
Why people do it: They think their expensive skincare must be better than provided products, they run out of provided ointment and substitute something else
The fix: Use ONLY provided products for first 2 weeks, buy more from me if you run out, resist temptation to use your regular products
Mistake #7: Sleeping on Face
What happens: Pressure and friction can cause uneven healing, pigment loss, shape distortion
Why people do it: Lifelong habit of sleeping face-down or on side, hard to change sleeping position
The fix: Sleep on back for first week, use extra pillows to prevent rolling, or use travel neck pillow to keep face elevated
Mistake #8: Skipping Touch-Up
What happens: You settle for light, patchy first-pass results instead of the full, defined final outcome you paid for
Why people do it: They think touch-up is optional, they're "fine with" how it looks, they don't want to go through healing again
The fix: Remember that touch-up is included in your $200 and essential, understand that first pass is only foundation, commit to completing the process
When to Text Me vs. When to Wait It Out
Here's guidance on whether your concern needs immediate attention:
Text Me Same Day
Signs of infection (increasing redness, pus, heat, swelling)
Allergic reaction (severe itching, rash, hives)
Excessive pain
Bleeding that won't stop
Skin that cracks or opens
Anything that feels like an emergency
Text Me Within 24-48 Hours
Extreme flaking with skin coming off in large pieces
Color that looks very wrong (bright blue, red, etc.) — though wait until after flaking
Asymmetry that seems extreme even accounting for healing
Questions about whether a product is safe to use
Unsure if something you're experiencing is normal
Wait Until Touch-Up to Discuss
Light first-pass results
Patchy appearance after flaking
One brow lighter than the other
Wishing they were darker or fuller
Minor shape adjustments desired
Normal healing progression questions
Never Needs to Contact Me
Very dark immediately after
Itching during days 3-7
Flaking during days 5-10
Looking patchy during flaking
Looking too light at weeks 3-6
Any of the "normal" symptoms listed earlier
When in doubt, text me. I'd rather answer 50 unnecessary questions than have one client worrying unnecessarily or not addressing a real problem.
Your Healing Survival Kit
Here's what helps clients get through healing successfully:
Physical Items
Provided by me:
Healing ointment
Gentle cleanser
Aftercare instructions
You should have:
Clean cotton pads
Distilled or filtered water for cleaning
Extra pillows for elevated sleeping
Wide-brimmed hat for sun protection
Entertainment (books, shows) for days you're staying home
Mental Survival Tools
Mantras for when you panic:
"This is temporary"
"Everyone's brows look terrible during flaking"
"The touch-up will fix everything"
"In 3 months, this will all be worth it"
Coping strategies:
Stop looking in the mirror 20 times daily
Put away your phone so you're not taking constant photos
Trust your artist's experience
Remember that thousands of people have gone through this successfully
Focus on the end goal, not the healing discomfort
Support system:
Tell friends/family you're in healing phase and may look weird
Don't schedule important events during first 2 weeks
Take time off work if you're self-conscious
Connect with others who've had powder brows to normalize the experience
Timeline Perspective
When you're on day 6 and panicking about flaking:
Remember:
You're 6 days into an 8-week process
You're less than 10% through
Final results emerge at week 12-16 from initial appointment
The current phase will be over in 3-4 more days
This temporary discomfort buys you 2+ years of perfect brows
Keeping this perspective helps tremendously.
What Your $200 Actually Bought
When you're frustrated during healing, remember what you invested in:
Not Just the Procedure
You paid for:
Expert technique creating beautiful shape
Quality pigments that heal true to color
Comprehensive aftercare products
My years of training and experience
Medical-grade safety and sterilization
The touch-up appointment (included)
My availability for questions during healing
Final results lasting 2-3 years
The Real Investment
You're investing in:
2-3 years of beautiful, defined brows
10+ minutes saved daily (no more filling in brows)
60+ hours of time saved annually
Confidence in your appearance
Brows that survive swimming, sweating, Florida sun
Looking polished immediately upon waking
No more worrying about brow makeup smudging
Cost breakdown:
$200 ÷ 24 months = $8.33/month
$8.33 ÷ 30 days = $0.28/day
You're paying 28 cents per day for perfect brows. The 2-3 weeks of healing discomfort is a tiny price for 2+ years of results.
When you're on day 7 thinking "I can't handle this," remember: you're paying 28 cents per day to never fill in your brows with makeup again. Two more weeks of patience gets you there.
Frequently Asked Questions: Powder Brows Healing
Why do my powder brows look so dark immediately after the procedure?
Your powder brows look alarmingly dark immediately after the procedure because you're seeing multiple layers of pigment at once. The pigment that's deposited into your dermis (the permanent layer) is mixed with pigment sitting on the skin's surface, lymph fluid that seeps from the micro-wounds, and minimal blood from the procedure. This combination creates a very dark, bold, intense appearance that's typically 50-60% darker than your final healed result. Additionally, the pigment hasn't oxidized yet — it's fresh and bright. Over the next 2 weeks, the surface pigment will flake off with your healing skin, the lymph fluid will absorb, and the remaining pigment will settle and lighten significantly. This dramatic darkening is intentional and expected — I apply knowing that approximately 40-50% of the color will shed during healing, so the initial application needs to be bold enough that sufficient pigment remains after healing. Don't judge your powder brows during the first week. The appearance on day 10-14 after flaking is complete is far more representative of your final result than day 1-7.
Is it normal for my powder brows to flake off in chunks and look patchy?
Yes, dramatic flaking between days 5-10 where visible pieces of color come off is completely normal and expected during powder brows healing. Your skin is shedding the damaged outer epidermis layer that was micro-injured during the procedure. This outer layer contains surface pigment, dead skin cells, and scabs — all of which naturally shed as new skin grows underneath. The flaking makes your brows look patchy, uneven, and concerning because some areas flake first while others retain their scabs longer, creating an obviously uneven appearance. Many clients panic during this phase thinking the procedure failed because they can see bare patches where color seems completely gone. However, the permanent pigment deposited into your dermis is still there — it's just hidden under the flaking layer. Once flaking completes (usually by day 10-14), the true retained color becomes visible. The patchiness you see during flaking is not your final result. Do NOT pick at the flakes trying to even things out — let them fall naturally to avoid removing pigment that should stay and creating actual patchy results.
What should I do if my powder brows look too light after the flaking phase?
If your powder brows look disappointingly light after the flaking phase completes around day 10-14, this is completely expected and part of the planned two-session process. The first appointment creates a foundation layer using conservative pigment application specifically because approximately 40-50% of pigment sheds during healing. What remains is intentionally lighter than your final desired result. This conservative approach prevents going too dark too fast, allows me to assess how your specific skin accepts and retains pigment, and creates a base for building additional coverage at your touch-up appointment. The light appearance after first-pass healing is not a failure — it's exactly what should happen. Your touch-up appointment scheduled at 6-8 weeks is when I'll add additional pigment to build the intensity, coverage, and definition you want. The second pass retains better than the first because your skin has been through the initial trauma and healing, and is more receptive to accepting additional pigment. Do not fill them in heavily with makeup before your touch-up — I need to see the true healed color to assess what we need to add.
Can I wear makeup over my powder brows while they're healing?
No, you should not wear makeup directly on your powder brows during the initial 2-week healing period. Makeup introduces bacteria to healing micro-wounds which increases infection risk, contains chemicals and ingredients that can interfere with pigment retention and healing processes, and requires removal which involves rubbing and scrubbing that can disrupt healing and pull out pigment. Additionally, trying to cover the very dark appearance during week 1 or the flaky appearance during week 2 with concealer or foundation will make things look worse, not better. You can carefully apply makeup around your brows (on your forehead, under-eye area, rest of face) starting around day 3-4 if needed, just avoid getting product directly on the healing brows. After day 14 when initial healing is complete, you can resume normal makeup application including on and around your brows. Most clients find they don't want or need additional brow makeup since the powder brows already create the filled-in appearance they were achieving with daily makeup, but you can add brow gel or slight additional filling if desired for special occasions.
How long until I can swim, exercise, or be in the sun after powder brows?
You must avoid swimming, intense exercise, and direct sun exposure for at least 2 weeks (14 days) after your powder brows procedure to ensure optimal healing and pigment retention. Swimming exposes healing skin to chlorine (pools), salt (ocean), or bacteria (lakes) that can pull pigment out, irritate wounds, and increase infection risk — wait full 2 weeks minimum. Intense exercise that causes heavy sweating should be avoided for 7-10 days because sweat is salty and acidic, which draws pigment out of healing skin and introduces bacteria — light walking is fine, but skip gym workouts, running, cycling, hot yoga, and any activity making you breathe hard and sweat heavily. Direct sun exposure should be minimized for 4 weeks because UV radiation breaks down pigment, causes premature fading, can alter color, and impedes healing — wear a wide-brimmed hat and SPF 50+ if you must be outdoors during the first month. For South Florida residents, being paranoid about sun exposure is appropriate given our year-round intense UV. After the initial 2-week healing period, you can gradually resume normal activities, but continue protecting your powder brows from excessive sun with daily SPF to maximize longevity.
Why does one powder brow look different from the other during healing?
Asymmetrical healing where one powder brow appears lighter, darker, more patchy, or heals faster than the other is extremely common and not a cause for concern. The two sides of your face have slightly different blood flow, skin characteristics, sleeping position effects (if you favor sleeping on one side), and healing rates. One brow might start flaking while the other is still scabbed, creating temporary obvious asymmetry. One side might retain more first-pass pigment than the other due to minor differences in skin texture or oil production. You might unconsciously touch or sleep on one side more, affecting healing. During the flaking phase (days 5-10), the asymmetry is often most dramatic and alarming, but this is temporary. Once both brows complete flaking and reach the fully healed stage at 6-8 weeks, I can assess the true retained pigment on each side and add strategic coverage at your touch-up to create symmetry. Some asymmetry in initial healing is expected and easily corrected. Don't panic about uneven appearance during active healing — wait until both brows are completely healed and then we'll perfect them at the touch-up.
What happens if I accidentally pick at the flaking skin on my powder brows?
If you accidentally pick at flaking skin on your powder brows, you risk removing pigment that was supposed to remain in your skin, creating patchy spots where color is missing, potentially causing scarring if you pick deep enough to damage healing tissue, and introducing bacteria from your hands which increases infection risk. The flaking skin contains some pigment that's being shed naturally, but underneath are layers that should stay — picking forces premature removal of these layers. If you do accidentally pick (it happens, especially during sleep), don't panic. The damage is usually repairable. Stop picking immediately, keep the area very clean, apply healing ointment gently, watch for signs of infection (increasing redness, pus, heat), and know that the touch-up appointment can add pigment back to any areas where picking caused loss. Most picking incidents create minor issues that are correctable rather than permanent disasters. However, repeated picking or picking at large areas can create significant patchy results requiring multiple correction sessions. The best approach is prevention — keep hands busy, wear gloves at night if you're a sleep-picker, and remember that every time you pick, you're literally pulling out the pigment you paid $200 for.
When will I see my final powder brows results after healing?
Your final powder brows results won't be visible until approximately 12-16 weeks after your initial appointment, which includes both healing periods. The timeline works like this: Initial appointment → 6-8 weeks of healing and color settling → touch-up appointment at 6-8 weeks → another 6-8 weeks of healing → final result emerges around week 12-16 total. After your initial appointment, you'll see the first-pass foundation layer by weeks 3-6 (after flaking completes), but this is intentionally light and not the final result. The touch-up builds on this foundation to create your desired intensity and coverage. After the touch-up heals (another 6-8 weeks), the true final result emerges as the pigment fully settles, oxidizes to its permanent shade, and your skin completely remodels around it. This final healed result is what you'll maintain for the next 2-3 years before needing a maintenance refresh. Many clients get impatient during the process, but powder brows are specifically designed as a two-appointment technique requiring full healing between sessions. Trying to rush it or judge results before complete healing leads to unnecessary disappointment. Trust the timeline — by month 4, you'll have the beautiful, lasting powder brows you invested in.
The healing process is uncomfortable, sometimes confusing, occasionally concerning.
But it's temporary.
And what's on the other side — 2-3 years of perfect, polished powder brows — is absolutely worth 2-3 weeks of patience.
Every client who's completed the process says the same thing: "I wish I'd known it would look this good, because the healing phase wouldn't have stressed me out so much."
Now you know what to expect. You know what's normal. You know when to worry and when to wait.
When you're on day 7, convinced everything went wrong, remember this guide.
And remember: I've guided hundreds of clients through this exact process. None of them regret it on the other side.
You won't either.
Book your powder brows appointment at heragencyusa.com.
I'm at Phenix Salon Suites, 7112 Beracasa Way, Suite 119, Boca Raton, FL 33433.
Let's create the brows you deserve.
The healing is temporary. The results last years.
It's worth it.